


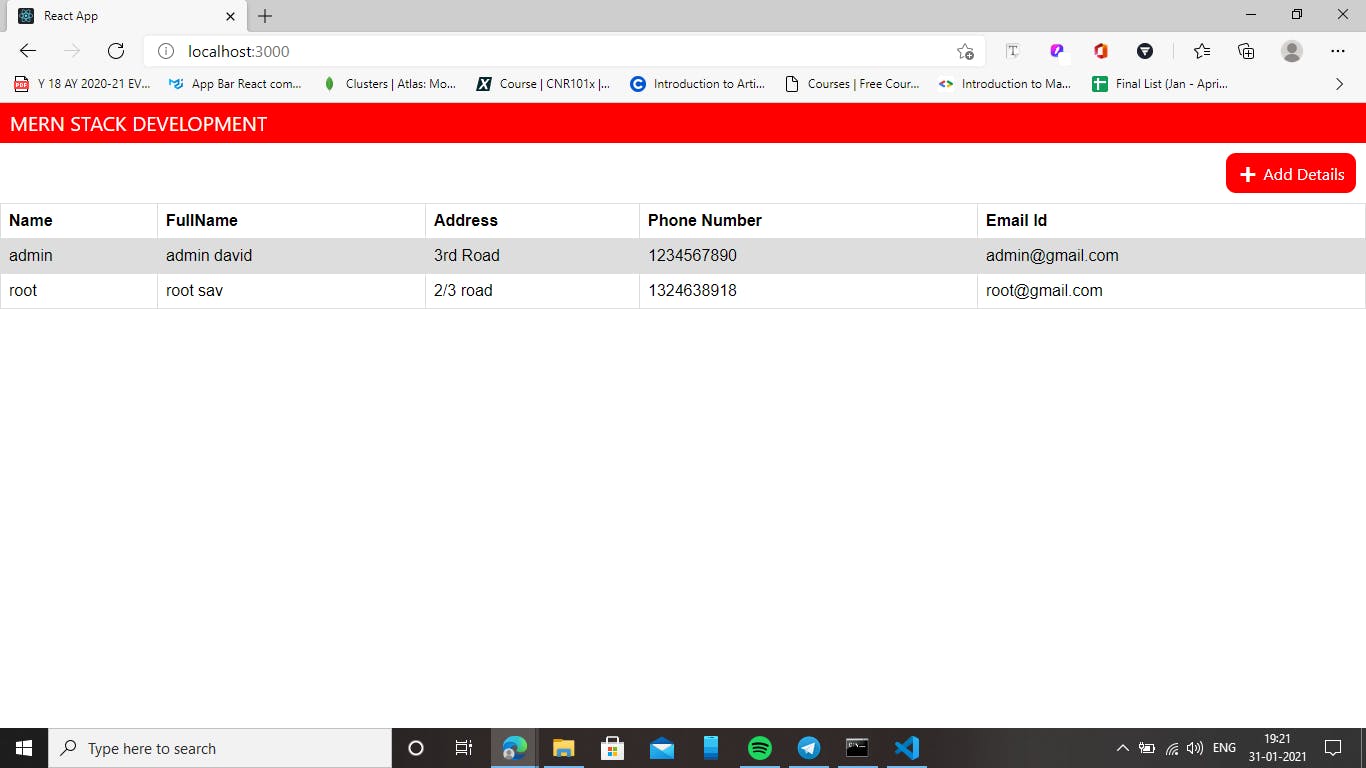
A simple MERN Full Stack application which will record and show the user Details.

This are the Output Screens for MERN application and you can also look at the MERN Full Stack website: React App (mern-full-stack-userinfo.netlify.app)


Get Started…
For creating a REST API for CRUD Operations, follow this page which helps you to create the backend part (REST API). REST API using MongoDB, Express.js and Node.js Lets try to make a REST API using MongoDB, Express.js and Node.jsaravind3009.medium.com
This page will help you to create a Cars details, But for this project we are creating User Details.
Just replace the schema file with the new one. From the above link we created like:
import mongoose from "mongoose"

const CarsSchema = mongoose.Schema({
    Name: String,
    Model: String,
    Price: String,
    meta: {
        Fuel_Type: String,
        Mileage: String,
        Seating_Capacity: Number
    },
})

export default mongoose.model("Cars",CarsSchema)
Need to Replace with:
import mongoose from 'mongoose';

const UserDataSchema = mongoose.Schema({
    Name: String,
    FName: String,
    Address: String,
    PhonNo: String,
    Email: String
})

export default mongoose.model("UserDetails",UserDataSchema)
And need to replace the names in get/post like:
app.get("/details", function (req, res) {

    UserDetails.find((err, data) => {
        if (err) {
            res.status(501).send(err)
        }
        else {
            res.status(200).send(data)
        }
    })

})

app.post("/details", function (req, res) {
    const dbdata = req.body

    UserDetails.create(dbdata, (err, data) => {
        if (err) {
            res.status(501).send(err)
        }
        else {
            res.status(201).send(data)
        }
    })
})
Run the server and host the application in H**eroku**.
Now Lets start with React.Js
Lets create a react project:
npx create-react-app simple_mern_app
Lets install some packages
- React-router-dom
npm i react-router-dom
- Axios
npm i axios
Lets Start:
- In app.js add the router to your apps:
import './App.css';
import { Link, browserHistory, IndexRoute, BrowserRouter as Router, Route, Switch } from 'react-router-dom';
import Home from './Home'
import AddDetails from './AddDetails'


function App() {
  return (
    <div>
      <Router browserHistory>
        <Switch>
          <Route  exact path='/' component={Home}/>
          <Route  exact path='/AddDetails' component={AddDetails}/>
        </Switch>
      </Router>
    </div>
  );
}

export default App;
- In Home.js we are adding a Navbar, Add Details Button, UserDetails_info and also navigating to AddDetails screen when the user click Add Details button.
import Navbar from './Navbar'
import Main from './Main'
import { Link, browserHistory, IndexRoute, BrowserRouter as Router, Route, Switch } from 'react-router-dom';

function Home() {
    return (
        <div className="App">
        <Router browserHistory>
            <Navbar />
            <div className="adddetails">
                <Link to="/AddDetails" className="link"><div onClick="window.location.href=window.location.href" className="btn">
                    <p><strong>+</strong> Add Details</p>
                </div></Link>
            </div>
            <Main />
        </Router>
        </div>
    )
}

export default Home;
- In Navbar.js file just a simple underorder list with the title of app in list
function Navbar() {
    return (
    <div className="navbar">
        <div className="right">
          <ul>
            <li>
              MERN STACK DEVELOPMENT
            </li>
          </ul>
        </div>
      </div>
    )
}

export default Navbar;
- In Main.js file we are creating a table which will have the user details, which are retrieved from the API. This will shown the data in tabular form.
import React, { useState, useEffect } from 'react';
import axios from 'axios'

function Main() {

    const [data,setdata] = useState([])

    useEffect(() => {
        async function fetchData() {
            const res = await axios.get("https://user-details-mern.herokuapp.com/details")
            setdata(res.data)
        }
        fetchData()
    })

    return (
        <div className="Main">
            <table>
                <tr>
                    <th>Name</th>
                    <th>FullName</th>
                    <th>Address</th>
                    <th>Phone Number</th>
                    <th>Email Id</th>
                </tr>
                {data.map((item) => (
                    <tr>
                        <td>{item.Name}</td>
                        <td>{item.FName}</td>
                        <td>{item.Address}</td>
                        <td>{item.PhonNo}</td>
                        <td>{item.Email}</td>
                    </tr>
                ))}
            </table>

        </div>
    )
}

export default Main;
- In AddDetails.js file we are creating a form which will take the Name, Full Name, Address, Phone Number and Email and when the user click submit the data from the form will be pushed into the app using
axios.postand after posting the it will need to redirect to Main Page.
import React from 'react';
import axios from 'axios'
import { Link, browserHistory, IndexRoute, BrowserRouter as Router, Route, Switch } from 'react-router-dom';

function AddDetails() {

    const handleSubmit = (e) => {
        e.preventDefault();
        var number = e.target.tel.value
        if (number.length == 10) {
            axios.post("https://user-details-mern.herokuapp.com/details")', {
                Name: e.target.name.value,
                FName: e.target.fname.value,
                Address:e.target.address.value,
                PhonNo:e.target.tel.value,
                Email: e.target.email.value
            })
                .then(function (response) {
                    try {
                        window.location.href = "/"
                    } catch (error) {
                        console.log(error);
                    }
            })
            .catch(function (error) {
                console.log(error);
            });
        }
        else {
            alert("Phone Should be correct")
        }

    }

    return (
        <Router browserHistory>
        <div className="form">
            <form onSubmit={handleSubmit}>
                <label>Enter User Details</label>
                <div className="Name">
                    <label>Name</label>
                    <input
                        type="text"
                        name="name"
                        placeholder="Enter your Name"
                        required
                        />
                </div>
                <div className="FName">
                    <label>Full Name</label>
                    <input
                        type="text"
                        name="fname"
                        placeholder="Enter your Full Name"
                        required
                        />
                </div>
                <div className="Address">
                    <label>Address</label>
                    <input
                        type="address"
                        name="address"
                        placeholder="Enter your Address"
                        required
                        />
                </div>
                <div className="PhonNo">
                    <label>Phone Number</label>
                    <input
                        type="tel"
                        name="tel"
                        placeholder="Enter your Phone Number"
                        maxlength="10"
                        required
                        />
                </div>
                <div className="Email">
                    <label>Email</label>
                    <input
                        type="email"
                        name="email"
                        placeholder="Enter your Email Id"
                        required
                        />
                </div>
                <input type="submit" onClick="window.location.href=window.location.href" value="Submit" className="submit"/>
                <Link to="/" className="link"><input onClick="window.location.href=window.location.href" type="button" className="btn" value="Go Back"/></Link>
            </form>
            </div>
        </Router>
    )
}

export default AddDetails;
Here e.target.{name}.value will be the value which we entered in form and {name} will be the name props in input type.
Finally Styling the page make your own changes or keep this css file App.css
Run the application by using:
npm start
Which will start the server and project will be running in the browser.
If you want to host the application you can do it in **Netlify.**
For hosting the application we need to move our application to deployment for that we need to do:
npm run-script build
Which will create you a build file. Now open netlify and drag and drop the build file and after few minutes the application will we hosted and it will be public..
You can also look at page : React App (mern-full-stack-userinfo.netlify.app)
Thanks for reading the article… That’s all for this application.. and you just created a simple MERN Full Stack Application……